The Outdoor Cannabis Calendar: Presenting at the Stratford Hort Society AGM

November 2, 2021


Stratford, Ontario, is a fantastic place to be a gardener.

The city’s status as a recent Grand Champion of the national Communities in Bloom competition is well deserved.

From its beautiful municipal parks and landscaping to its popular community vegetable gardens, to the many garden centres and tours it hosts… if you dig plants, Stratford is where it’s at.

The people of Stratford have been digging plants for a long time… the Stratford and District Horticultural Society (aka the “Hort Society”) has been bringing together our area’s gardeners for over 140 years!

After 142 years of Annual General Meetings, the Hort Society’s 2020 AGM (which took place on January 27) was most definitely the first to offer education on Stratford’s new favourite plant: Cannabis.

And who better to provide tips and techniques for Stratfordites looking to grow cannabis in their gardens than GreenSeal’s very own Master Grower Chad Morphy (who himself was recently honoured as Canada’s Top Grower by Grow Opportunity magazine)?

Chad was accompanied by Steve Stacey, GreenSeal’s Business & Production Coordinator (who you might recognize from our previous post on the Stratford Chefs School’s Cooking with Cannabis classes).

Chad and Steve started their presentation off with some important basic principles all gardeners should know when growing cannabis.

Photoperiods: Cannabis is a photoperiodic plant which means its flowering is usually triggered by the regular interruption of its light cycle for 12 or more hours.

Choosing the right strain: Home growers should choose feminized seeds, and Indica strains are more compatible with Canada’s outdoor growing conditions than tropical Sativa cultivars.

They also talked about the relatively new phenomenon of autoflowering cannabis and the fascinating origin story of this new class of cannabis strains:

They covered the basics for watering and irrigation (tip: when you’re growing in pots, let them dry out completely before you soak them again to prevent harmful anaerobic microbes from forming. You can tell they’re completely dry when you lift them and they’re light).

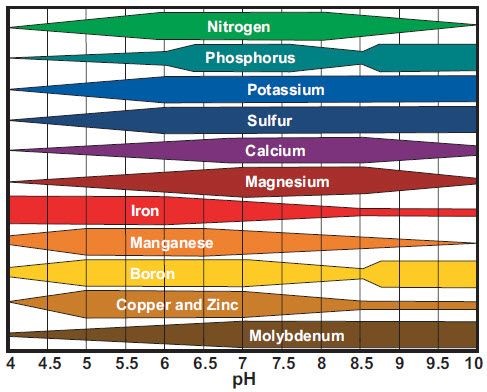
Chad then broke down the ABCs of NPK (Nitrogen-Phosphorous-Potassium, the main macronutrients in plant fertilizers) and explained the importance of the micronutrients calcium and magnesium for growing exceptional cannabis.

Steve offered some advice on security for backyard plants (Wifi video cameras are widely available, and well-built trellises can play a dual role in supporting your plants while also making them harder to steal).

The final general principle was focused on properly drying and curing harvested cannabis (which should promote the slow release of moisture over time to preserve cannabinoids and terpenes).

Once these basic principles were covered, Chad and Steve walked the audience through their “Cannabis Calendar,” a month-by-month breakdown of all the tasks for growing next-level outdoor cannabis at home.

We’ve reprinted it below (bookmark this page for handy quick reference) or you can view a PDF of Chad & Steve’s full original PowerPoint presentation here (ages 19+ only).

February: Let’s get poppin’!

Time to start your seeds

Seeds should be germinated before planting (NOT direct-sown into the ground in spring). There are two common methods:

The first is to place seeds between two moistened pieces of paper towel. Once the seed “pops” and a small white root appears, transplant it 1/4 inch deep into a 3-inch pot containing potting mix.

The second method is to fill a 3-inch pot with potting mix and use your fingertip to create a 1/4 inch deep hole in the top surface. Mist daily with water until the seed pops and the root starts to form, usually after 3-4 days (but up to 14 days if they’re stubborn!).

For both methods, remember to direct the sprouting root downwards when planting.

A typical setup for starting seeds (and/or clones) includes a T5 florescent tube fixture in a room at approximately 72-75°F and 60% Relative Humidity.

March: They grow up so fast!

Time to transplant & feed your seedlings

Transplant seedlings into bigger pots.

Begin feeding weekly with vegetative “Grow” nutrients. Cannabis-specific nutrients are recommended over generic fertilizers (e.g. MiracleGro).

Stratford tap water usually clocks in at around 7.3 pH. But when we look at the chart above, the macro- and micronutrients a cannabis plant needs are best absorbed around 6-6.3 pH. Refer to the original presentation for tips to adjust the pH of the water you use for your plants to the optimal level.

Once four or five “nodes” appear you should pinch-off or “top” the seedling to encourage  fuller growth from the lower nodes (making the plant bushier rather than growing straight up as a single stalk).

Nutrients Chart

April: Attack of the clones!

Time to take cuttings from mother plants

Start clones (cut from the original seedlings you planted) or buy/find rooted clones (be mindful of your 4 plant limit!).

There are two equipment formats for cloning:

1) Aeroponic chambers create a mist for roots to grow in while cuttings are suspended in rubber foam “pucks.”

2) Rockwool or Oasis cubes are soaked for one hour with 5.5 pH water and placed in a tray with a clear plastic dome over it.

Cut 3-4-inch shoots from an existing plant and immediately dip the bottom of the freshly-cut stem in Stim Root (powdered/gel rooting hormone, see above).

Immediately put the cut stem into the hole in the soaked Rockwool/Oasis cubes or the rubber foam pucks. Waiting will allow air bubbles to form.

New roots should start to appear after 10-14 days and the clones should be ready to transplant into pots with soil after “hardening off.”

May: Location, location, location!

Time to choose and prep your outdoor site

Find a location that offers full sun during the day and ZERO light at night.

Dig a BIG hole 3’x3’x3’ minimum.

Consider visibility and security when choosing your site location.

Fill with soil mix:

Start with loose non-native soil (e.g. peat-based mixes with lots of perlite like ProMix HP).

Add amendments (worm castings, triple mix, rock mineral salts, bone meal, blood meal).

For the last week of May, “harden off” plants started indoors by placing them outside (but not in direct sunlight) during the days and bringing them back inside and back under the lights at night.

June: Let there be sun!

Time to transplant your plants outside

Transplant plants from pots into your prepped holes in week one.

Install chicken wire around young, tender plants to prevent damage from small rodents, rabbits and deer.

Apply vegetative “Grow” nutrients by mixing weekly with pH-adjusted water during this phase.

Prune plants by clipping off ends of long branches, encouraging thicker, bushier growth.

You can also “train” longer branches by staking or tying them down. Horizontal branches will sprout multiple upward shoots rather than becoming a single, huge vertical “cola.” Multiple smaller tops rather than single huge ones also help prevent mould and “bud rot” when the flowers are fully formed.

July: Thank you for your support!

Time to set up your trellises

There are a couple of approaches to trellising cannabis plants to keep buds upright and prevent them from snapping off.

1) Install horizontal trellis netting. Two layers are advised; one layer should hold up the bottom halves of the heavy flowers, and a second layer 12 inches higher will hold up the flower tops.

2) Make vertical hard trellises using wire fencing. Create a cylinder using wire farm fencing (see photo above) and wrap it around the plant. The branches can be trained into the gaps in the fence. For the inner layer, you can start with a tomato cage as soon as you put your plants into the ground.

Slow-release fertilizers containing nitrogen should not be applied after mid-July.

August: Let the flowering begin!

Time to switch to flower/bloom formula nutrients

In mid-August switch nutrients to a weekly dose of Flowering formula (aka “Bloom”) in anticipation of the plant switching from vegetative growth to flower production.

Bloom formulas have higher percentages of phosphorous (which promotes tighter node formation and flower production).

Once flowers start to appear (which is actually week 2 of flowering), remove bottom vegetation (aka de-noding). You can strip all the small branches and leaves below the first layer of trellis to encourage the upper growth of flowers.

Generally, plants will double in volume between mid-August and mid-September.

September: Getting closer!

Time to add potassium for optimal finishing

Prune off any dead/wilting leaves (this is normal when nitrogen is reduced).

Monitor for Powdery Mildew; if found, water leaves first to prevent spreading and manually pull leaves with visible PM off.

After 4 weeks of visible flowers (which is actually the 5th week of flowering, usually the last 2 weeks of September), add more potassium to the weekly nutrient feeding mix to promote ideal “ripening.”

PK Boost is a product that can be added to Bloom nutrients to increase potassium.

Alternatively, there are nutrients labelled as “Finishing” which have increased potassium.

October: Patience pays off!

Time to wait for plants to achieve the perfect ripeness for harvest

The most common mistake is to harvest before the plant is ready. Ripeness is key, and plants should take 8 to 10 weeks of flowering to ripen fully.

Plants can put on 25% of their total flower weight and dramatically increase cannabinoids in the final 10 days.

Cannabis can withstand – and even benefit from – exposure to light frosts (0˚C down to -2˚C). Light frost decreases the uptake of phosphorous, which often causes plants to turn purple in the fall.

If the weather report is calling for a hard freeze (lower than -2˚C) you need to harvest or cover up your plants.

A plant is ready to harvest when 90% of its flowers’ “hairs” have turned orange. If you have access to magnification, you can also look at the bud trichomes (mushroom-shaped glands), which should all have turned milky white (with 25% appearing amber in colour) when the plant is ready to harvest (see photo above, only one or two trichomes have turned amber).

When harvesting, cut the stalks well above the roots, pull off all the big feeder leaves, and hang the flowers in a cool, dark environment with indirect fans circulating air. Ideal conditions for drying are 50% room humidity and 65˚F.

You do not want to dry your flowers as quickly as possible as this will create a harsh flavour. It should take several days minimum.

The initial drying process is complete when you can bend a small stalk and it snaps rather than bends. At this point, the flower is ready for trimming and curing.

November: Reap what you’ve sown!

Time to properly dry and cure your bountiful crop

Trimming cannabis flowers by hand can be extremely time-consuming. You can cut down on trimming time by only trimming the top flowers and leaving the smaller buds untrimmed to be used in edibles.

Once trimmed, place buds in glass mason jars for final curing. Fill a jar halfway to the top and seal; open the jar daily to release any gasses.

You can add a 62% Boveda humidity pack (see photo above) to each jar to ensure the flower remains at ideal humidity.

After opening the jars daily for at least two weeks (preferably a month or even two!), you can fill them with the cured cannabis and replace the 62% Boveda pack with a 58% pack (over the long term, a Boveda pack needs to be replaced when it becomes dried out and feels hard when you touch it).

Store sealed jars in a dry, cool, and dark environment. Exposure to air and light deteriorates THC over time.

Any Questions?

The audience at the Stratford Horticultural Society AGM had a tonne of questions for Chad and Steve after their presentation.

Recognizing the Q&A period could go on for hours, the Hort Society eventually had to call it a night.

They thanked the guys for speaking to the group and passed along an honorarium that was immediately donated back to Seeds of Diversity (a partner along with the Hort Society on the upcoming “Seedy Sunday” event hosted by the Local Community Food Centre on Feb. 16).

If you have a question for Chad and Steve about outdoor cannabis growing tips and techniques, please post it in the comments below and they’ll reply with some helpful advice!

2 Comments

  1. Afternoon Louis! Once the curing process is complete you should be completely fine to refrigerate your buds. So long as they are kept in an airtight, dark, cool place, your potency shouldn’t degrade. Terpenes will naturally degrade over time, but refrigeration will help slow that process down a lot.

Leave a Reply

Your email address will not be published. Required fields are marked *

Post comment